Saturday, December 3, 2016

Installment 3 - Quilter's Joy Mystery Quilt

In this installment we had only three tasks to accomplish but two of them were distressing to me.  The beginning of our class entailed tasting the recipe that was provided in our instructions:  Molasses Cookies.  Even though I am a diabetic, I had to eat one of the cookies!  They were delicious and moist!  I loved them.  Julie, our instructor had made them the night before and I couldn't believe that they were so delicious.  

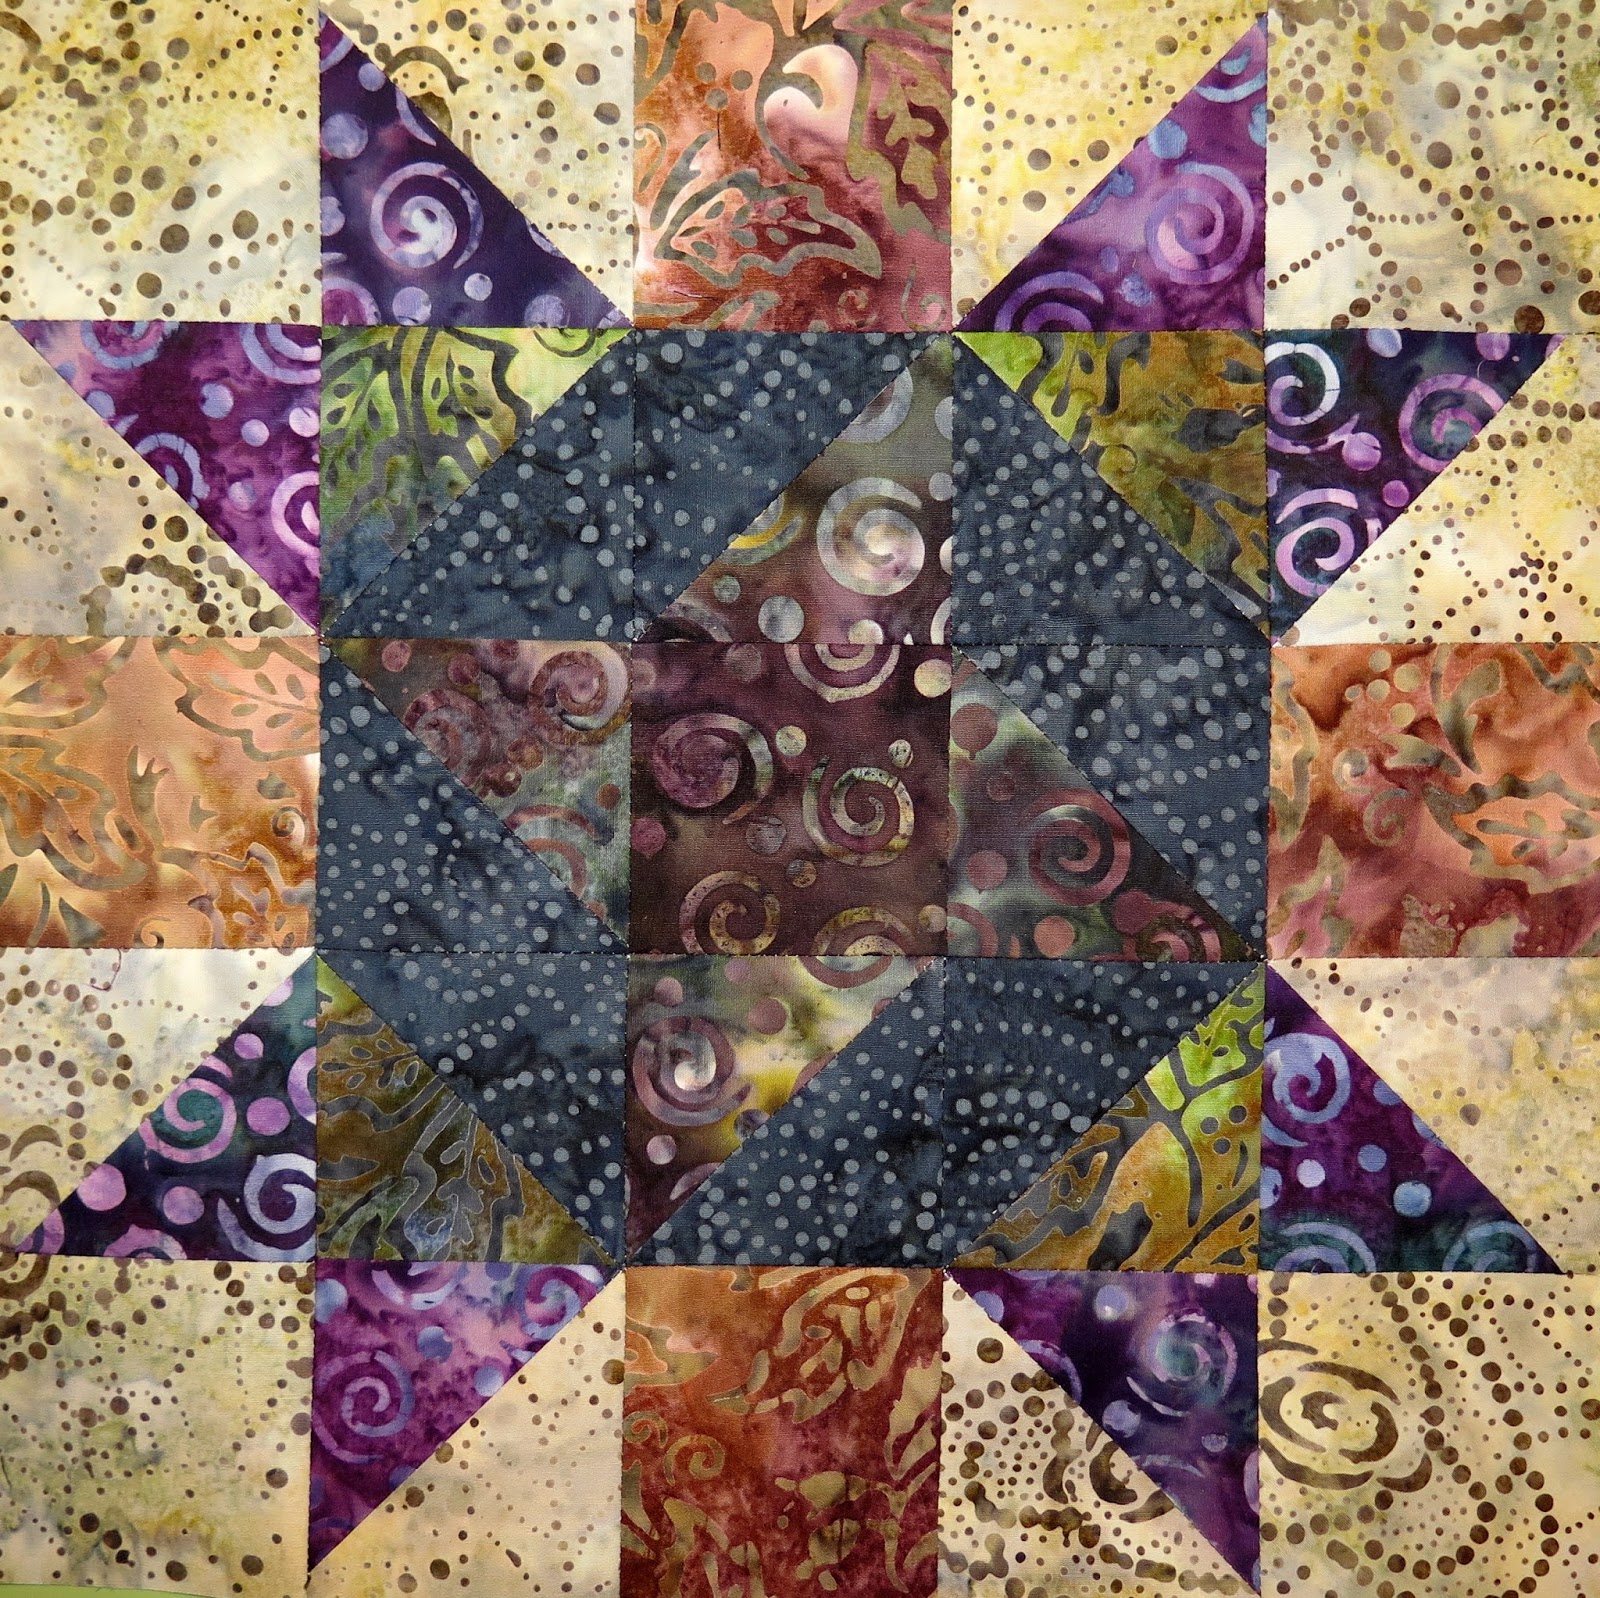
Our first task was to take these little flying geese that we made last month (from Baggie D).  


This photo is the entire first task that we had to sew.  The middle section, flying geese was made last month.  First, we had to cut 36 - 3 inch squares and cut them diagonally from corner to corner.  I sewed on each side of the flying geese. The next step was to take the 36 pieces from Baggie A (installment 1) and attach it to the top.  We were told to trim.  I had to email our instructor Julie because I did not want to "mess" this up by cutting at the wrong angles. She assured me that it would be alright but I was still apprehensive.  As you can see, it turned out okay but we won't know until we start sewing these "parts" together.  Ack, I hate NOT knowing whether they will fit together!

The second task was easy.  All we had to do was to cut 18 - 1 7/8" x 12 1/2."


The third task was a bit more time consuming.  


Since I am making the queen sized quilt, I had to make 180 pieces of this block. It wasn't easy because each strip was 1 1/2" strips.  I had to take great care to be sure that the middle strip was exactly 1 inch once it was sewn to the first beige strip.  I ran the edge of my iron against the grey strip to be sure that it was 1 1/4."  Once that was done, I had to add on the other beige strip.  That was fairly easy because I was assured that I had done it right because I was so careful.  The next part was much more fun because I already knew that I had ironed correctly and measured after each ironing.  Phew, it turned out great and I hope that I have no problems adding this onto to the subsequent pieces once I start sewing them together.  

I am so glad that this is done.  I stressed about each of the cutting portions of this installment.

Friday, November 25, 2016

Sleigh Bell BOM - Month 5 - Wreath

This month's block for the Sleigh Bell Quilt is a wreath.  It is cute and was so easy to sew together.


I forgot to take a photograph of the "wreath" block before I attached it to the row.  The block to the left, the mitten, was last month's block.

Monday, November 14, 2016

New Quilts - Primo Plaids Bedding Ensemble

I decided to make the Primo Plaids quilt since I spied this quilt last summer on a website.  I love stars and love flannel so what a great combination and quilt for me to try to make.  I tried to get the free pattern first on-line...couldn't do it.  I tried to figure out what the size of the stars were....12 inch (finished) stars.  I just wanted to find some plaid fabric too...couldn't find much of a selection during the summer.  So I waited until I saw the kit on-line.  I actually saw the blue version of the kit on two web sites, well...I knew one was SLOW in the delivery to my home and the other was a bit faster so I went with the faster on-line retail store to get it to me sooner. Believe me, it was not cheap.  I found out why when I opened the package when it arrived.  The fabric is woven cotton, very thick and I thought to myself, what have I gotten myself into?  I have never sewn with this thick fabric before; does it actually fold over when I try to iron it?


This is the free pattern that was included with the fabric.  I really, really like the blue flannels. I thought it would be easy to do but I have a few suggestions if you decide to use the plaid flannels by Marcus Fabrics.  I will tell you my observations later in this post.


Each block is 12 1/2 inch (unfinished) square. The kit has enough fabric to make the quilt which is 94" x 94" for a good-sized queen bed.  I believe there is extra fabric to make the two pillows, instructions are included in the pattern.  I don't know for sure yet but I will let you know as soon as I get to the end to see if there is enough fabric to make the pillows.


Of course, the fabric is a bit "stretchy."  That worried me this morning when I started to cut the fabric.  I worried also about the directional nature of the plaids.  I chose to ignore it while I was making the first block.  I just wanted to get through this process and see what I could do to improve and streamline the making of each block.  I sometimes do not use the first block that I make because it does not look quite as good as the subsequent ones.

My tips:  First, I kept all of the fabrics at my cutting table.  I usually cut at the table (in my dinning room) and move everything to my sewing machine area nicely folded and take it back and forth as I need more fabric.  I decided not to do this as to not stretch the fabric. Second, I used my longer and stronger flower-head pins to keep the fabric in place while I sewed.  My small fine needles were difficult to see in the thick flannel and I was afraid that I would hit one of them or bend them.  Third, I also used water to spray on the cotton when I needed to fold the fabric.  I am was initially nervous about using a spray starch or the Mary Ellen's Best Press.  I may use Best Press, I think it will be okay.  Whenever I make stars, I always use Deb Tucker's ruler, Wing Clipper.  I tried it and it was not as easy as using regular cotton fabric.  I will try it again. Hopefully it will work better.   

Oops, I forgot to mention that I have a Janome Memory Craft 7700 QCP. Fortunately, it has a built in Dual Feed option.  I actually purchased the quarter inch foot at Rosie's in San Diego.  It helps immensely when there are think seams to sew through.  I decided to use this foot because of the added thickness of the flannel.  I have never had a problem whenever I use it. I have my regular sewing foot that jumps because of the thickness or continues to sew and not move.  If you this sort of feature on your sewing machine, I recommend that you try to use it. 

Well, that is it for now.  I will try to let you know if I encounter other problems.

Sunday, November 13, 2016

The last blocks of the "Check Out the Stars" Quilt

Here are the last of the blocks for my "Check Out the Stars" Quilt.  I made a total of thirty blocks, two of each of the fifteen blocks made.  I will ask my youngest daughter to help me put it together. She is coming home next Saturday for Thanksgiving.  If she doesn't like some of the blocks I can easily make more.


On to making another quilt.

Sunday, November 6, 2016

16th Month - Flock of Feathered Stars

This is the 16th month of the Flock of Feathered Stars block of the month.  We have two more months of this BOM.  This month's block is called "Chestnut Burr."  It was very easy compared to some of the other blocks because it has fewer "feathers" and they were larger.


We have one more block that is in the book and it is 24" square.  It is the center square and I don't know if we have to do this block in one month and my question is:  what are we doing during the 18th month?  I can't wait to find out.

The photograph of the blocks is not accurate:  they are block and beige.  For some reason they are not showing beige tonight.  

We're getting close to the end of this BOM.  I can't wait to finish it and take to a quilter to finish.


Thursday, November 3, 2016

More Blocks - Check Out the Stars

I have a few more blocks to share of my quilt, "Check Out the Stars." 


These are three additional blocks that sewed since my last posts of blocks.  I have a total of 16 of 30 needed.  I am in love with this block because of the large pieces and ease of sewing it together.  There is nothing fancy about the block but it has been fun putting it all together.  The only thing that I don't care for are the amount of "turquoise" that are in the blocks.  Obviously, I have quite a bit of turquoise.  I went to my local fabric store and purchased a few more "blue" pieces of fabric to move it away from so much "turquoise."  I hope it works out.  I will let you know.  


Saturday, October 29, 2016

Check Out the Stars - Blocks

I have made some progress on the "Check Out the Stars" blocks.  To recap, I decided that I would make the queen-sized quilt which requires thirty blocks (5 blocks wide and 6 blocks in length).  I have made ten so far because the kit that I purchased contains enough fabric for only twenty blocks.  Fortunately, each block is 16 1/2 inches square.  I made two of each block so I will show you only five here.


I posted this block a couple
of days ago.

Thursday, October 27, 2016

Quilter's Joy Mystery Quilt

Last month, I neglected to mention that I joined the Quilter's Joy Mystery Quilt by Beaver Creek Station (BCS) Pattern Company.  I enjoy this group immensely, not because of the quilt but the group of women that are there with me.  We meet the last Wednesday of the month at 10:30 am.  They are a friendly group and seem to be experienced quilters.  

We purchased all of our fabric needed before the class began and selected the fabrics that we wanted to use:  Moda's 3 Sisters, Courtyard or Moda's French General, Madame Rouge.  I selected the French General's Madame Rouge.

Moda Charm Pack - Madame Rouge by French General


Moda Charm Pack - Courtyard by 3 Sisters
             
Both fabric lines are lovely but 
I am a fan of red and gray.

We had a choice of the size quilt that we wanted:  either 'Lazy Lap" or "Quaintly Queen."  Of course, I had to choose the queen-sized quilt.  I had to buy additional fabric because the lap-sized kit was cut for this class.  We were also instructed to have twelve large zippered baggies to keep our fabric pieces organized.

The first class was fun and all we had to do was cut pieces and make flying geese.  The second class held yesterday it entailed much more cutting and some sewing, a 4-patch, 4 1/2 inches by 4 1/2 inches.


From last month's instructions:
A - 36 Pieces of Fabric #2
B - 18 Pieces of Fabric #3
C - 36 Pieces of Fabric #1
D - 36 Pieces of Fabrics #2 & #4


I just finished this month's cuttings:
E - 18 Pieces of Fabrics #2 & #6
F - 9 Pieces of Fabric #2
G - 18 Pieces of Fabric #2
H - 160 Pieces of Fabric #2


I apologize for the poor quality of the two photos above.  I did not use a place with good lighting because it had been raining all day.  I will do better in the future.  I thought that I could lighten them up when when I edited them.

At the end of each month's instructions, there is a recap of everything that we should have and in which zippered baggie.  I love that this inventory is included.
I am thoroughly enjoying making this quilt because of the great fabrics we are using and the "mystery" of what the quilt will look like at the end of the eight month program in April, 2017.

Monday, October 24, 2016

I Found Another Kit to Sew!

I found another kit while I was organizing (little at a time) my fabric stash.  I found a kit that I, again purchased from Connecting Threads.  I seem to have quite a few kits from the same era, around 2007, from the back of the pattern, the copyright date.  I can see why I was attracted to this kit:  the pattern features blue batiks.  My favorite color and type of fabric that I love to sew.  The pattern is called "Check Out the Stars."  It came with the original pattern by Quilt Moments.  Marilyn Foreman is the designer and it is stunning.  It has directions to make four sizes:  throw (48" x 64"), twin (64" x 80"), full/queen 
(80" x 96") and king (96" x 102").  In addition, there are directions to make the quilt with charm packs, layers cakes, fat quarters and yardage. 

20 blocks
Twin - 60" x 80"

I make all sizes of quilts but if I am planning to give it away I have to make at least a queen size quilt.  Everyone in my immediate family has a queen bed. The instructions for the pattern state that you need to make thirty blocks for a full/queen.  I believe that is five blocks across and six blocks vertical.  That decided, I made my first block this morning.  

16 1/2" square block

Fabric was included in the kit but I have to add 3 yards of my own fabric to make the queen.  That was not hard to find...I have a huge stash of blue batiks and accompanying fabrics that would compliment all of the fabric.  "EASY PEASY AND ONE BLOCK DONE AND TWENTY-NINE TO GO."  I will work on it when I can and hopefully be done soon. It is very easy to sew together and with the large blocks, the work goes fast. Each block is 16.5" square!  Love it!

Saturday, October 22, 2016

Recap - Last Week

I picked up my fourth installment of the Sleigh Bell Block of the Month.  It is a cute winter mitten.  


I forgot to add the steam marks
 last month.  I finished it yesterday.

Row 1 - 10.5" x 38"

Small Quilt with Binding

Window Wreath Quilt also
 with binding

Friday, October 14, 2016

Summer of Spools

I found another kit as I was organizing my stash.  I bought it, again, several years ago from "Connecting Threads."  For those of you who are not familiar with "Connecting Threads," it is an online shopping site.  It carries books, patterns, notions, fabric and a myriad of quilting supplies for quilters.

I came across this small quilt, 21 1/2 inches square, and I thought it would be easy to finish.  It was, I started yesterday late afternoon and finished this morning.


I enjoyed sewing this quilt because the colors were sweet and it was fairly easy to finish.  The instructions were also easy to follow.  I as amazed as I looked at the kit.  Binding is usually included but everything needed was in this kit including the backing.  

Monday, October 10, 2016

Thimbleberries Window Wreath

This afternoon, I was moving some kits (trying to organize) that I purchased quite a few years ago. I am sure that it was at least ten years ago.  Every time I see the kit, I tell myself that I should make this simple quilt.  I am easily distracted so I don't follow through and do it.  I decided that today was the day especially since Christmas is coming up and I might be able to quilt it with a few months to go.  


Window Wreath Pattern


37" x 37"

I made the wreath (middle) according to the instructions in the pattern.  I had so much fabric with the kit that I decided to make the inner borders larger.  I made the inner red and cream borders 2 1/2 inches instead of 1 1/2 inches.  I did not have enough fabric to make the inner green border 2 1/2 inches so I made it an even 2 inches.  I did in fact follow the pattern and cut the outer border at 5 1/2 inches.  It was so easy to make that it only took me a couple of hours to put the whole quilt together.  The original quilt that I was going to make is only 32 inches.

Flock of Feathered Stars - Month 15

I couldn't sleep so I decided to try to complete the most recent block of the Flock of Feathered Stars.  The block is named the "Feathered Star, Finley."


These are the three blocks that we sew each month.  I believe there are only 48 blocks in the border so next month will the last of the blocks that we make.


These blocks are easy to make so don't be afraid to do them.  

A Month Long Vacation in Europe

My youngest daughter traveled to Europe during the month of September with her boyfriend and friend.  From the pictures that she sent to us, she had a blast.  I was unable to visit with her until this past weekend.  It was fun looking at her photos.  

She purchased four fat quarters for me to add to my stash while in Europe!


She bought them in Amsterdam.   The fabric came in this very cute bag with a drawing of a canal.  I thought it was very sweet of her to think of me.  I told her not to spend any money on gifts but she did anyway.  I made a quilt for her bed in the dorms her first year at  UC San Diego.  I used quite a bit of Kate Spain fabric (Good Fortune) and was surprised to see some of Kate Spain's fabric in the bag.  Thanks Caroline.


Sunday, October 2, 2016

River Rock BOM - TOP FINISHED!

This morning, I was able to finish the top for the River Rock Quilt!  It is so big that I will have to take it to my quilter to have her do the quilting.  It is an astonishing 79" x 86."  It was so big that I had my husband hold it up while I photographed it and he had to stand on stair steps that leads into our living room in order for me to photograph a majority of the top.


I loved making this quilt.  If you have the opportunity to make this quilt, you should do it.  It was fun and easy because of the large blocks.  At my local quilt shop, Fabric Garden in Sacramento, the initial offerings were scooped up and they had to open a second group to accommodate all of the interested quilters. My favorite fabrics, batiks, were used and it is stunning.  There is a second color way with brighter fabrics but it isn't available at our local shop but I have seen it on other websites but I can't produce a copy for this blog.    


Sunday, September 25, 2016

River Rock BOM - Month 9

This month is the last month of the River Rock BOM.  I made an error and stated that I would put the blocks together and publish the photos.  There were blocks to make this month before I could sew them together.  Here they are:

Block A - 13" x 13"

Block B - 20.5" x 20.5"

Spacer - 8" x 13"


Friday, September 23, 2016

Sleigh Bell BOM

As promised yesterday, I have taken a photo of the three border blocks for the Flock of Feather Star Block of the Month.  We made three of the border blocks each month and we have made 42 of them so far.  We have 48 total blocks in the borer so six are left to make.  Woo Hoo!


I also partially finished the "Steaming Cup", month three of the Sleigh Bell Block of the Month.  I have actually the "steam" to embroider in order to "finish" the block.


Steaming Cup


Illustration from the book with the steam.

This month was the last of the River Rock Quilt.  I will sew it together in the next few days and publish the photos of the completed quilt.  Of course, the quilting will not be done.

Flock of Feathered Stars - Month 14

I fell behind this month because of the Judy Niemeyer pattern and my attempt at organizing my stash.  I stopped organizing and stopped sewing my JN pattern so that I can catch up on my three BOM (block of the month) that I am a participant:  Flock of Feathered Stars, Sleigh Bell and River Rock. 

I finished the 14th installment of the Flock of Feathered Stars block this morning.  It took me all day yesterday to carefully take the paper off the back of the block because it is a paper-piecing project.

Feathered Star No. ! - 12.5" x 12.5" Unfinished

This particular block was a bit more difficult than the past blocks.  The feathers on this block were smaller and required more thought when sewing all of the pieces together.  There were quite a few places that you had to make sure that seams were sewn together.  Overall, it was a great block.  I love the way it looks and I am looking forward to finishing this quilt.

I have finished one of three blocks for the border and will post a photograph of it when I post photos of this month's  Sleigh Bell Block.

Sunday, September 18, 2016

I took a Judy Niemeyer Class

I have been going to a Judy Niemeyer Certified Store for years now in San Mateo, the Scruffy Quilts shop.  I have always looked at all of the Quiltworx quilts on the wall and I've always wanted to take a class from a certified instructor but the classes are two weeks or longer and I can't attend all of the classes.  San Mateo is near my husband's family but it is 2 1/2 hours away.


I signed up to receive the emails that they send out.  They sent out a plea for more students a couple of days prior to the class, August 28.  It was a one day class and they needed students.  We were going to visit my mother-in-law and I thought this is the perfect opportunity because it was also 2 days prior to my 60th birthday.  What a way to celebrate my birthday by taking a class at Scruffy Quilts!  I was ecstatic!  I called the store and they told me that I could chose between two patterns to make: Ice Crystals Quilt or the Winter Wonderland Table Runner.  Both use the same "star."  At first, I decided to do the quilt but then I read the instructions and I had to have 10 blue fabrics and only two days to gather all the materials needed.  I changed my mind and called them back and they were able to find one pattern of each for me to purchase on Sunday.

There were four students there and the instructor was sweet, Gretchen Veteran. She was also very knowledgeable.  I was the only one there who did not have experience with a JN pattern.  I did do the One Leaf pattern several years ago but that was pretty easy.  I enjoyed this class because we got right down to work and started with the instructions.  There are always corrections to be made and it depends on when your pattern was printed.  The most current patterns have the least corrections and the first patterns printed always have the most errors.  The table runner pattern instructions have ONLY eight pages of instructions!  The Ice Crystals pattern has twenty pages of instructions.  Of course, the pattern that I had was one of the older ones and I had to make many corrections.  I found that going through the instructions helped me understand how to get through to the end.  Gretchen explained that these patterns are made on CAD engineering programs.  My engineering daughters use CAD at work and I am so impressed with the entire Niemeyer family that make the patterns with this complex program!  Anyway, each time a caller had an error to correct, the Niemeyer's check it out and make the correction. That is why the date at the end of the pattern is important.  You can download any corrections to your computer from the Quiltworx website.


Ice Crystals


I have one of the snow flakes done now.  I made a few errors but I figure i did it on the table runner and not the quilt.


1/8 of the snow flake.


Two more Snow Flakes to go.

I've enjoyed sewing and paper piecing this block.  It was easy but it wasn't that difficult once I got used to the directions.  I will hopefully be done in the next few weeks.

I needed time to clean up my sewing area.  Unfortunately, after I started I decided I had quite a few more things to do.  You know how that is....you can see areas that need more work and you stop to do them.